


Hat Patch University
Patch Border Color Choices for Hat Makers

For most hat patches, a merrowed border in a thread color that either matches the dominant design element or holds perceived contrast sufficient to visually frame against the background twill gives you the best combination of durability, visual containment, and clean attachment. If your design is irregular or full-color, a hot-cut edge with a matched twill surround is the cleaner call.
Three reasons this approach works consistently:
- Durability: A merrowed overlock stitch seals the patch perimeter against fraying, which matters most on hat brims and crown panels that take constant abrasion.
- Visual containment: A border frames the design and separates it from the garment color, so the artwork reads clearly even on busy or patterned fabrics.
- Attachment compatibility: A merrowed edge gives a sewing machine a defined track to follow; a hot-cut edge lies flatter for adhesive and iron-on applications.
Vendor brief to send right now: “Please produce [patch name] with a [merrowed / hot-cut] border in thread color [HEX or PMS number], [X]mm stitch/edge width, on [twill color]. Send a digital proof before production.”
Key Takeaways
Choosing the right border style and color comes down to matching the border method to the patch shape and use case, then selecting a thread color that either matches the twill or holds clear contrast against it.
| Point | Details |
|---|---|
| Border type by shape | Use merrowed for round/oval hat badges; use hot-cut for irregular shapes and full-color UV prints. |
| Color contrast rule | Aim for perceived contrast sufficient to visually frame between border and adjacent background for legibility on small patches. |
| Vendor brief essentials | Always specify border type, thread color by HEX or PMS, stitch width in mm, and attachment method. |
| Always request a proof | A digital or physical proof before production catches color drift and border weight issues before full runs. |
| Hat Patch Supply options | UV-printed, laser engraved, and embroidered patches are available with no minimums and fast turnaround. |
Table of Contents
- Why do patches need borders, and how does the purpose change by application?
- Merrowed vs. hot-cut borders: which one fits your patch?
- How do you choose the right border color, step by step?
- How do you read vendor color charts without getting burned?
- How does your border choice affect finishing and attachment?
- Hat Patch Supply product pairings and vendor-ready requests
- What small border decisions actually change the finished look on hats
- Hat Patch Supply makes the ordering process straightforward
- Sources
Why do patches need borders, and how does the purpose change by application?
A border is not decoration. It is a structural and visual decision that changes depending on where the patch lives and how much wear it takes.
On the durability side, the border stitch or sealed edge prevents the patch fabric from unraveling at the perimeter. Without it, repeated washing, flexing, and abrasion pull threads loose from the outside in. Hat brims and crown panels are among the highest-abrasion placements in apparel, so border integrity matters more here than on a jacket back panel that rarely contacts hard surfaces.
Visually, the border acts as a frame. It creates a clean boundary between the patch design and the garment fabric beneath, which is especially important when the garment color is close to one of the design colors. Without that frame, the design can visually bleed into the fabric and lose legibility at small sizes.
Use-case differences are real and worth planning around:
- Hat patches need a border that can handle repeated flexing along the brim curve; thinner merrow profiles (3–4mm) sit flatter and sew more cleanly around curved panels.
- Jacket sleeve patches tolerate a wider, bolder merrow because the surface is flatter and the patch is often a statement piece rather than a subtle brand mark.
- Uniform patches frequently follow branch or department standards that specify border color explicitly, so the functional rule here is compliance first, aesthetics second.
A hat badge with a 3mm merrowed border in matching navy thread reads as a refined brand mark. The same design on a jacket sleeve with a 5mm gold merrow reads as a bold insignia. Same artwork, very different results based on border width and color alone.
Merrowed vs. hot-cut borders: which one fits your patch?
The border method you choose shapes the patch’s edge profile, durability, attachment options, and overall visual weight. These two methods cover the vast majority of production scenarios.
Merrowed (overlocked) borders use a looped overlock stitch that wraps around the patch perimeter, creating a raised, rounded edge. The stitch is typically 3–6mm wide and adds visible color and texture to the patch outline.
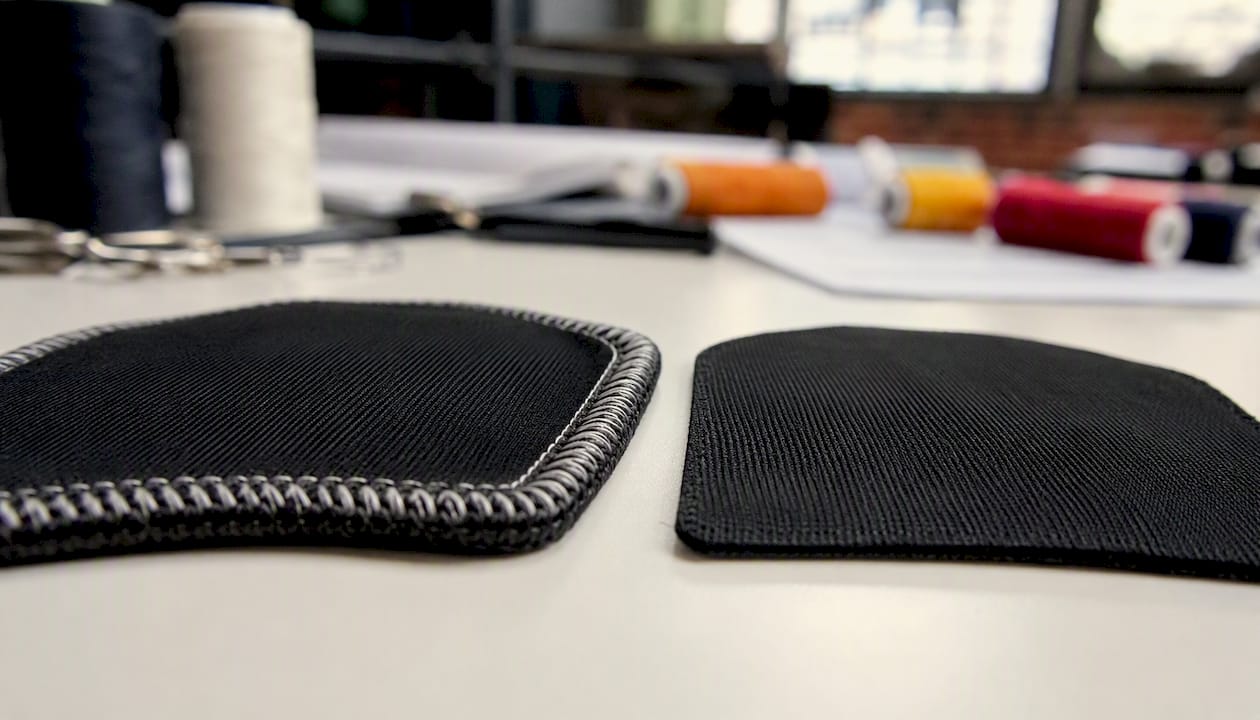
Hot-cut (heat-sealed or laser-cut) borders seal the edge of the patch fabric with heat, leaving a clean, flat perimeter with no raised stitch. The edge color matches the twill or backing material rather than a thread color.
| Feature | Merrowed | Hot-Cut / Laser-Cut |
|---|---|---|
| Edge profile | Raised, rounded overlock stitch | Flat, clean sealed edge |
| Best shapes | Round, oval, shield, rectangle | Irregular, die-cut, complex outlines |
| Durability | Very high — stitch protects perimeter | High — sealed edge resists fraying |
| Visual weight | Adds visible border color and thickness | Minimal; edge matches backing fabric |
| Sewing compatibility | Excellent — defined track for machine | Moderate — thinner edge, less grip |
| Adhesive / iron-on | Works, but raised edge can lift | Preferred — lies flat for full contact |
| Cost | Slightly higher | Comparable or lower for simple shapes |
| Hat-brim suitability | Good with thin profile (3–4mm) | Excellent for curved or irregular shapes |
When to choose merrowed: classic round or oval hat badges, patches where seam strength is the priority, and designs where the border color is part of the visual identity. A merrowed embroidered patch in a contrasting thread color reads as a traditional, high-craft finish.
When to choose hot-cut: full-color UV-printed designs, irregular or die-cut shapes, and patches that will be applied with adhesive or iron-on backing. The flat edge maximizes contact area for heat-activated adhesives and sits flush against curved hat panels.
Pro Tip: Request side-by-side mockups of the same artwork with both border types before committing to production. The visual weight difference is often larger than designers expect, especially on small hat patches.
How do you choose the right border color, step by step?
Border color selection follows a repeatable logic. Work through these steps in order and you will arrive at a defensible, production-ready choice every time.
-
Define your intent. Are you matching (border disappears into the design), contrasting (border frames and separates), or accenting (border adds a third color for visual interest)? Uniform patches usually require matching for compliance. Morale patches and brand-first hat badges often benefit from contrast.
-
Check your background twill color. The twill is the base fabric of the patch, not the garment. If your twill is black and your design is primarily white and red, a black border matches the twill and frames the design cleanly. A red border accents the design. A white border creates maximum contrast.
-
Apply the 30–40% contrast rule. For a border to read as a distinct frame rather than a blur, it needs roughly perceived contrast sufficient to visually frame against the adjacent color (either the twill edge or the nearest design element). On small hat patches, this threshold is the difference between a border that registers and one that disappears.
-
Decide thread vs. twill strategy. Matching the border thread to the background twill gives a contained, monochromatic look. Matching it to a dominant design color ties the border into the artwork. A thin contrasting outline (often white, black, or gold) works well when the design has no single dominant color.
-
Translate your color to a vendor-ready format. Thread colors are specified by number (Madeira, Isacord, or Pantone thread references). For digital-to-physical accuracy, provide a HEX or RGB value alongside the thread number. The CSS border-color property accepts named colors, HEX, RGB, and HSL formats, which maps directly to how you should communicate color values in a digital mockup or vendor brief. When color accuracy is critical, request a Pantone Matching System (PMS) number from your vendor.
-
Test under multiple garment colors. A navy border on a black hat reads as nearly invisible. The same navy border on a tan or olive hat reads clearly. Always preview your border color against the actual garment colors you plan to sell.
Pro Tip: When building a digital mockup to preview border colors, Tailwind’s border-color utilities (including border-current and border-transparent) let you quickly test how a border reads against different background tints before you commit to a thread number.
How do you read vendor color charts without getting burned?
Vendor border color charts list thread color numbers, often with small fabric swatches or printed photos. Both formats have limits that catch designers off guard.
Printed swatches are photographed under studio lighting, then printed or displayed on a monitor. The thread color you see in a catalog photo can shift significantly when the actual thread is stitched onto a textured twill under different lighting. Monitor calibration adds another variable: the same HEX value looks different on an uncalibrated laptop screen versus a color-corrected display.
Common mistakes to avoid:
- Selecting a border that disappears on the garment. A medium gray border on a heather gray hat is nearly invisible. Always check the border color against the garment fabric, not just the patch twill.
- Choosing colors that clash with apparel trims. A bright orange border on a hat with navy stitching and a red logo creates visual noise. Pull one color from the existing trim palette when in doubt.
- Skipping the proof. This is the most expensive mistake in patch production. A proof catches color drift before you run a full order.
Ordering checklist for reliable color matches:
- Request the vendor’s thread color number (Madeira, Isacord, or equivalent catalog reference).
- Provide your HEX or RGB value alongside the thread number. W3Schools documents the common formats (name, HEX, RGB, HSL, transparent) that translate cleanly between digital design tools and vendor briefs.
- Ask for the PMS equivalent when color accuracy is non-negotiable (uniforms, licensed brand patches).
- Request a physical or high-fidelity digital proof before approving production.
- Specify an acceptable color tolerance in writing (most vendors work within a Delta-E of 3–5 for thread matching).
Bootstrap’s border utilities documentation shows how CSS variables and opacity helpers let you adjust computed border color without recompiling, which is directly useful when you are previewing subtle tint variations in a web-based mockup before locking in a thread number.
How does your border choice affect finishing and attachment?
The border method you choose has direct consequences for how the patch is attached and how it behaves in production.
| Attachment Method | Recommended Border | Why |
|---|---|---|
| Sew-on | Merrowed | Raised edge provides a defined sewing track; stitch line follows the merrow cleanly |
| Adhesive (pressure-sensitive) | Hot-cut | Flat edge maximizes contact area; raised merrow can reduce bond at the perimeter |
| Iron-on (heat-activated) | Hot-cut preferred; thin merrow acceptable | Full flat contact needed for even heat transfer; thick merrow can cause uneven adhesion |
| Velcro (hook-and-loop) | Either; hot-cut preferred for irregular shapes | Flat edge allows cleaner Velcro placement without bunching at the border |
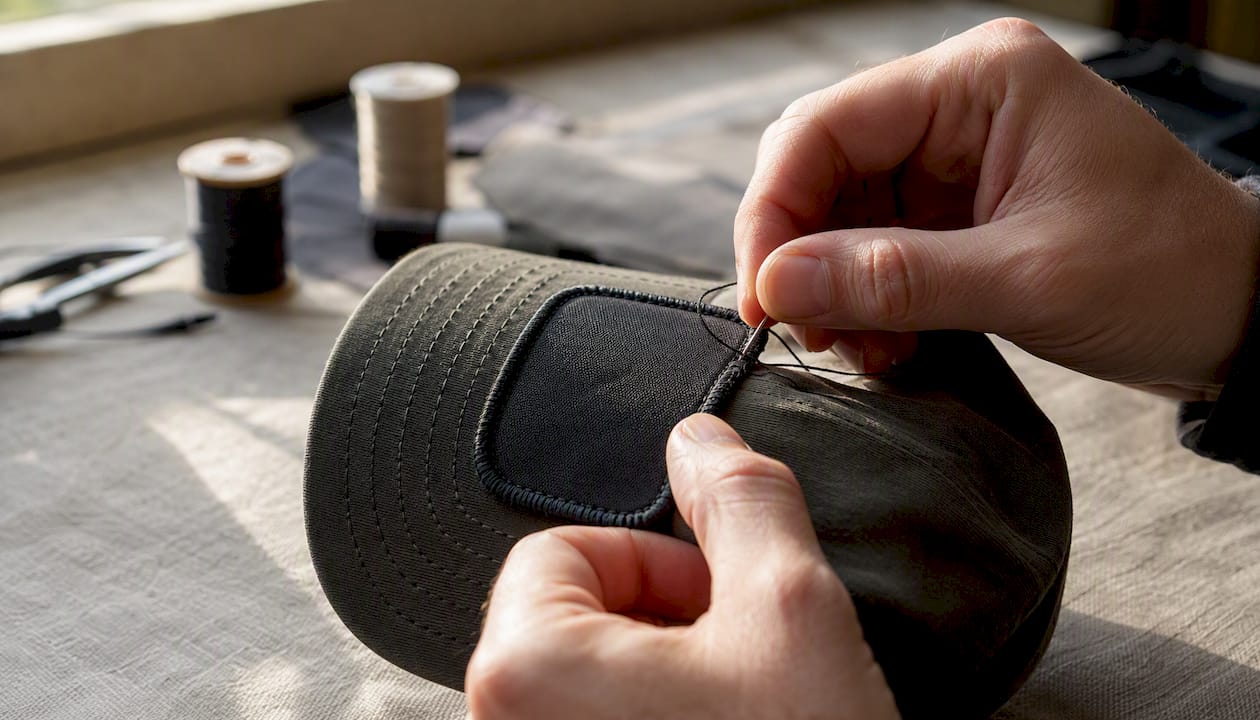
Border thickness also affects sewing radius. A 5–6mm merrow on a small 2-inch hat patch leaves very little room for the sewing machine foot to clear the edge without catching the stitch. A 3mm merrow on the same patch allows a tighter sewing radius and cleaner results on curved hat panels.
Pro Tip: When ordering patches for hat brims specifically, request a 3mm merrow profile and ask your vendor to confirm the stitch density at the curve points. A thinner merrow with reinforced corner stitching gives you a cleaner sew-down without bulk.
Hat Patch Supply product pairings and vendor-ready requests
The border rules above map directly to the three main patch types Hat Patch Supply produces, and each type has a natural border pairing.
- UV-printed patches: Full-color artwork with photographic detail works best with a hot-cut edge. The clean perimeter lets the printed image read without a competing thread color at the border. The Troutscape UV Printed Patch is a strong example of how a matched-twill hot-cut edge keeps the focus on the artwork. For a full-color logo or badge, custom UV-printed hat patches with a hot-cut border and a twill color matched to the hat panel give the cleanest result.
- Laser engraved leatherette patches: These use the natural leatherette edge as the border. The material’s own color (tan, dark brown, black) becomes the border treatment. No thread color decision is needed; instead, specify the leatherette base color and the engraving depth.
- Embroidered patches: Classic merrowed border in a thread color that either matches the background twill or provides deliberate contrast. For hat badges, a 3–4mm merrow in a color pulled from the design palette is the standard production choice. Partner examples like embroidered patches from WarbeardProject show how merrowed edges read at finished size.
Production checklist to send Hat Patch Supply:
- Artwork file (vector preferred: .AI or .EPS; high-res .PNG accepted)
- HEX and/or PMS number for each critical color, including the border thread
- Border type: merrowed or hot-cut, with stitch/edge width in mm
- Twill color (specify by name or HEX)
- Attachment method: sew-on, adhesive, iron-on, or Velcro
- Proof preference: digital proof only, or physical sample before full run
For a deeper look at how UV-printed, laser-engraved, and embroidered options compare on production and border behavior, the UV printed vs. laser engraved vs. embroidered guide at Hat Patch Supply covers each method in detail.
What small border decisions actually change the finished look on hats
The rules above are solid. What they do not capture is how a few subtle calls can separate a patch that looks professional from one that looks like a first attempt.
Border width relative to patch size is the most underestimated variable. A 5mm merrow on a 1.5-inch patch consumes a significant portion of the visible area and can make the design feel cramped. Dropping to a 3mm merrow on the same patch opens up the design and reads as more refined, especially on premium structured hats where the patch is a brand statement rather than a bold graphic.
Panel color matters more than most designers plan for. We have seen patches with a perfectly chosen border color look completely different once placed on the actual hat. A sand-colored merrow that reads as warm and neutral on a white proof looks almost invisible on a natural canvas hat. Testing the border color against a physical fabric swatch before approving production saves real time and money.
On premium hats, the case for subtlety is strong. A thin merrow in a color that closely matches the twill, rather than a high-contrast accent, signals quality and restraint. Bold borders work well for morale patches and event merchandise. For a brand-first hat badge meant to carry a logo on a retail product, the border should support the design, not compete with it.
Mockups are not optional. We treat every new border color combination as unproven until we see it on a hat mockup under realistic lighting. The Adobe Illustrator mockup tool from Hat Patch Supply makes this step fast and removes most of the guesswork before production starts.
Hat Patch Supply makes the ordering process straightforward
When you have worked through your border type, color, and attachment method, Hat Patch Supply handles the rest with no minimum order requirements and fast production turnaround. Whether you need custom UV-printed patches with a clean hot-cut edge, laser engraved leatherette with a natural material border, or classic embroidered patches with a merrowed finish, the production options cover every border strategy covered in this guide.
Start by uploading your artwork and specifying your border type, thread color (HEX or PMS), and attachment method. Request a digital proof before approving production. Hat Patch Supply’s team confirms thread numbers and border specs before any patch goes to press, so color drift between your mockup and the finished patch stays minimal. Visit Hatpatchsupply to start your order or request a sample mockup.
Sources
These resources support the technical color and border decisions covered above:
For final color verification, always request a physical proof or high-fidelity digital proof from your vendor. No screen or document substitutes for seeing the actual thread color stitched on the actual twill under real lighting.
Recommended
- Thin Blue Line UV Hat Patch - Stylish and Durable Design – Hat Patch Supply
- Thin Red Line UV Printed Hat Patch - Quality and Durability – Hat Patch Supply
- If It Flies Hat Patch - Stylish Acrylic Design in 3 Colors – Hat Patch Supply
- Be Salty Stay Lit Acrylic Hat Patch - 2 Colors Available – Hat Patch Supply
Ready to press your own?
Custom UV patches with no minimum, shipped in 72 hours — or grab a free-shipping sample pack first.