


Hat Patch University
Vinyl Banner Storage: The Professional's Preservation Guide

That single protocol, followed consistently, is what separates banners that last years from ones that crack, yellow, or mildew after a single season. The sections below break down every step of that process, from the cleaning table to the storage rack, with the research-backed benchmarks and practical trade-offs you need to make confident decisions about vinyl banner storage.
Quick-start checklist (do this before storing any banner):
- Clean with mild soap and water; rinse fully and air-dry completely before touching the core
- Roll onto a rigid cardboard or PVC tube, minimum 3 inches in diameter (4 inches for large banners)
- Slide the roll into an opaque tube or padded bag; cap both ends
- Place horizontally on a shelf or rack, off the floor, away from concrete and HVAC vents
- Label the tube with the banner name, dimensions, last-used date, and next inspection date
- Schedule a monthly check for banners stored longer than six months
Key Takeaways
Proper vinyl banner storage comes down to five non-negotiable practices: roll on a rigid core, control the environment, store horizontally, protect from light and moisture, and inspect on a schedule.
| Point | Details |
|---|---|
| Roll, never fold | Folding cracks ink and stresses vinyl permanently; always use a rigid 3–4 inch core. |
| Follow the 60/60 Rule | Target 60°F and 60% RH to prevent plasticizer migration, mold, and ink delamination. |
| Store horizontally | Horizontal racks distribute weight evenly; vertical storage concentrates it and causes creasing. |
| Inspect monthly | Re-roll in the opposite direction each month to prevent permanent set and catch early damage. |
| Hatpatchsupply banners | Built with UV-cured inks designed for durability through repeated storage and handling cycles. |
Table of Contents
- How to prepare your banners for vinyl banner storage
- Correct rolling technique: direction, core size, and tension
- Housing options that protect your rolled banners
- Temperature, humidity, light, and placement: the 60/60 rule
- Packing and moving banners without adding creases
- Routine checks and minor repairs: a monthly maintenance cadence
- How long banners last and what shortens their life
- Options for old or damaged banners
- Why temperature cycling and humidity damage vinyl: the evidence behind the 60/60 rule
- Your printable pre-storage checklist
- Hatpatchsupply has the supplies to back up every step in this guide
- Sources
How to prepare your banners for vinyl banner storage
Skipping the cleaning step is the fastest way to ruin a banner in storage. Dirt, salt residue from outdoor use, and adhesive traces create a chemical environment that accelerates mold growth and ink degradation once the roll is sealed inside a tube.
The correct cleaning sequence is straightforward. Use a mild soap solution and a soft cloth or non-abrasive sponge, working in gentle circular motions across the print surface. Avoid solvent-based cleaners entirely, as they strip protective coatings and can lift ink from the substrate. Rinse with clean water and allow the banner to air-dry fully, flat or hanging, in a well-ventilated space.
Heat is not a shortcut here. Heat guns and forced-air tools create uneven temperature zones across the vinyl surface, which can warp the substrate or damage ink adhesion. Air drying is the only safe method before rolling, and the banner must be completely dry before it touches the core. Residual moisture trapped inside a roll is the primary catalyst for mold growth.
While the banner is flat and accessible, run a quick inspection:
- Check all seams and hems for fraying or separation.
- Examine grommets for sharp edges or loose reinforcement rings that could cut into adjacent layers when rolled.
- Look for small tears or punctures and repair them with banner repair tape before rolling.
- Protect exposed grommets by wrapping them with a strip of soft foam or acid-free tissue before the banner goes onto the core.
Pro Tip: Before rolling, write the banner’s ID, dimensions, and last-used date on a strip of masking tape and stick it to the backing side near one edge. When the roll is labeled on the outside of the tube, you can cross-reference without unrolling.
Correct rolling technique: direction, core size, and tension
Rolling sounds simple until a banner comes off the core with a permanent spiral crease or sticky ink transfer. The technique matters, and the core diameter matters even more.
Core diameter
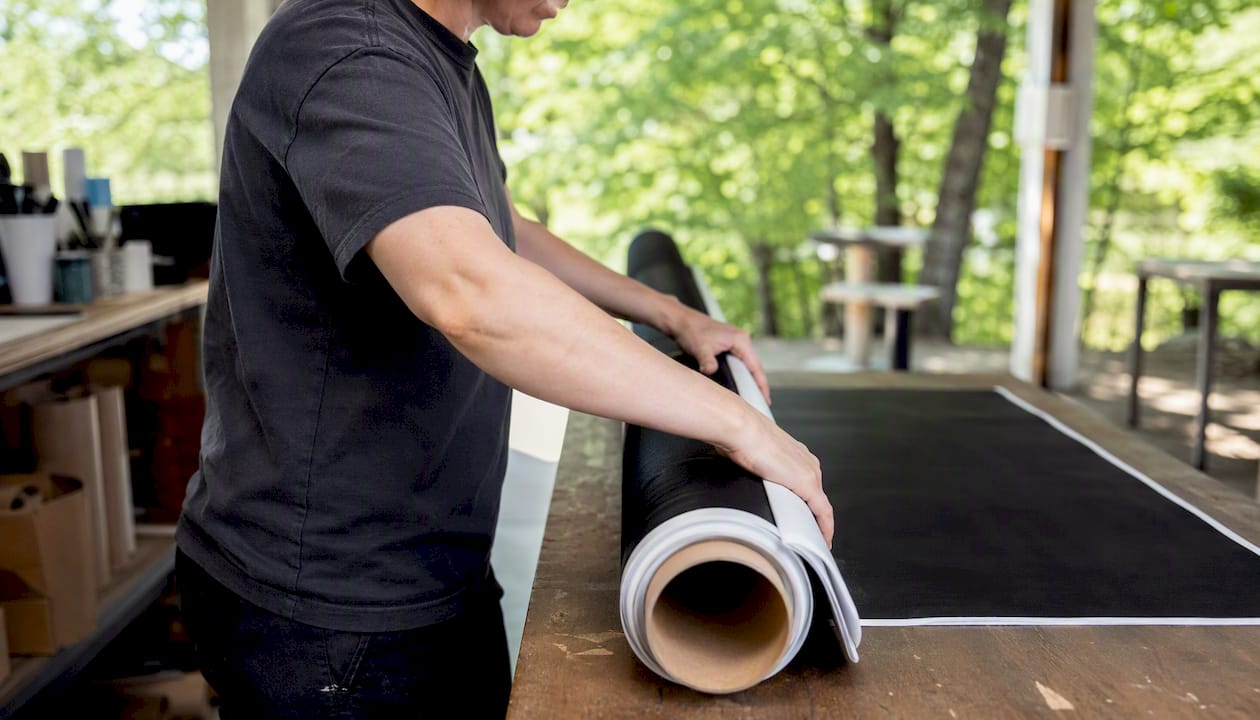
Use a rigid cardboard or PVC tube with a diameter of 3 to 4 inches. A wider core distributes the banner’s curvature across a gentler radius, reducing stress on both the vinyl substrate and the ink film. For large-format banners, a 4-inch core is the professional standard. Rolling onto a narrow core, or worse, rolling without any core at all, creates a tight inner radius that fatigues the material with every storage cycle.
Core diameter callout: A minimum 3-inch diameter is the industry floor; a 4-inch core is preferred for any banner wider than 4 feet or longer than 8 feet.
Rolling direction
The print-side-in versus print-side-out debate has a practical answer. Rolling with the print side facing outward is commonly recommended for vinyl banners with glossy finishes, because it prevents the ink surface from pressing against the backing material in humid conditions, which reduces the risk of ink transfer or sticking. In drier climates or with matte-finish banners, rolling print-side-in can offer surface protection from abrasion. When in doubt, glossy or UV-printed finishes should roll print-side-out. You can read more about how UV-cured inks behave under stress to understand why finish type influences this choice.
Step-by-step rolling procedure
- Lay the banner flat on a clean surface, print side down (for print-side-out rolling).
- Position the core at one short end of the banner, centered and aligned with the edge.
- Begin rolling slowly and evenly, keeping consistent tension across the full width.
- For banners wider than 5 feet, use a second person to hold the far edge and maintain even tension.
- Roll snugly but not tightly. The goal is firm contact without compressing the material.
- Secure the roll with two or three soft hook-and-loop straps or cotton ties. Never use rubber bands, which can indent the surface.
Pro Tip: If a banner has been stored rolled in one direction for more than three months, re-roll it in the opposite direction during your next inspection. This prevents the material from taking a permanent set in one curve.
Housing options that protect your rolled banners
Once the banner is rolled, the housing you choose determines how well it survives both storage and transit.
- Original shipping tube: The best starting point for most banners. Manufacturers size these tubes to match the correct core diameter, and they typically block light. If you still have the original tube, use it.
- Rigid cardboard or PVC tubes: A reliable alternative when the original packaging is gone. PVC tubes are more moisture-resistant than cardboard and worth the upgrade for banners stored in variable-humidity environments. Cap both ends with foam-padded end caps to protect the rolled edges.
- Padded carrying bags: Useful for frequent transport but offer less crush protection than rigid tubes. Best combined with a rolled core inside the bag rather than used as the sole housing.
- Retractable banner stands: For banners used on a regular event schedule, a retractable stand that houses the graphic in a sealed cassette removes rolling variables entirely. The banner stays under consistent, controlled tension inside the cassette, which is a professional-grade solution for high-frequency use.
For grommets and ends, wrap exposed metal hardware in foam padding or acid-free tissue before the roll goes into its tube. Grommets that press against the inner tube wall can leave indentations in the vinyl layers beneath them.
Temperature, humidity, light, and placement: the 60/60 rule
Environmental conditions are where most banner storage failures originate, and the fix is specific.
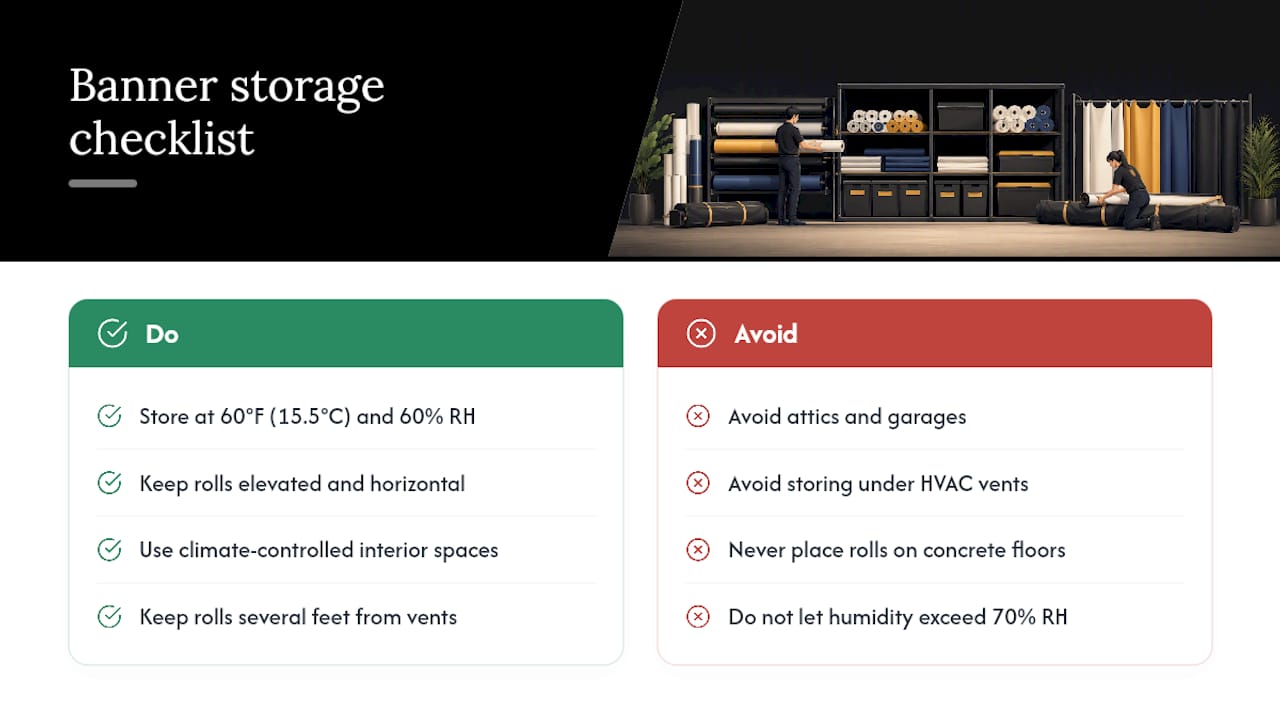
The professional benchmark is the 60/60 Rule: target storage at approximately 60°F (15.5°C) and 60% relative humidity. At these conditions, PVC plasticizers remain stable, ink films maintain adhesion, and mold has no moisture surplus to exploit. Humidity above certain high levels creates conditions where mold can establish itself inside a sealed roll over time.
Temperature cycling is a separate and underappreciated hazard. Repeated thermal cycling between extremes fatigues PVC and can cause ink delamination, even if neither the high nor the low temperature would be damaging on its own. Attics and garages are the two most common storage failures for this reason. An attic in a northern U.S. climate can swing from below freezing in January to over 120°F in July. Each cycle stresses the material. A climate-controlled interior space, even a closet or utility room, is a better choice than any unconditioned space.
Environmental callout: Humidity above 70% RH is the threshold where mold risk becomes active inside sealed rolls. The 60% target provides a meaningful safety margin.
HVAC proximity is its own problem. Vents create localized hot and cold zones that cycle with the thermostat, so a roll stored directly beneath a ceiling vent experiences repeated temperature swings even in a climate-controlled building. Keep stored rolls at least several feet from any vent, radiator, or exterior wall.
Concrete floors wick moisture upward, creating a moisture gradient at the contact point while the rest of the roll stays dry. That gradient is exactly the condition mold needs. Keep all rolls elevated on shelves, racks, or pallets, never directly on a concrete surface.
Packing and moving banners without adding creases
Transport is where well-stored banners often pick up the damage that storage prevented.
- Lay rolled banners horizontally in the vehicle, supported along their full length. A banner roll balanced on its end in a cargo area will shift and flex with every turn.
- Pad the rolls with moving blankets or foam to prevent contact with hard surfaces and sharp edges.
- When transporting multiple banners, separate them with soft cloth or bubble wrap to prevent scuffs and color transfer between graphics.
- For shipping, use rigid tubes with foam-padded end caps and cushion between multiple tubes in the same box. Never let tubes roll freely inside a shipping carton.
- Two-person lifts are the right call for wide or heavy rolls. Supporting the roll along its length during a lift prevents the center from sagging and stressing the inner layers.
Pro Tip: After long-distance transport, unroll the banner briefly to let it relax, then re-roll before returning it to storage. Extended pressure from a single position during transit can create subtle flat spots that compound over time.
Routine checks and minor repairs: a monthly maintenance cadence
Banners stored for more than six months need a scheduled inspection, not just a visual check when you happen to need them.
- Monthly inspection items: Look for fraying at hems and seams, mildew spots (which appear as dark speckling on the surface or backing), ink transfer between layers, and flat spots from uneven pressure.
- Safe unrolling: Unroll on a clean, flat surface with enough room to lay the banner fully flat. Never pull the banner off the core under tension.
- Re-roll reversal: After inspection, re-roll in the opposite direction from the previous storage orientation. This prevents the material from taking a permanent curve.
- Mildew treatment: Light surface mildew can be treated with a diluted white vinegar solution applied with a soft cloth, followed by a full air-dry before re-rolling. For significant mildew penetration into the substrate, replacement is the safer choice.
- Grommet reinforcement: If grommets show signs of pulling away from the hem, reinforce with grommet repair tape before the next use. A failed grommet under tension can tear the banner.
- Record-keeping: Update the label on each tube after every inspection. Note the inspection date and any repairs made. For high-volume operations, label tubes with banner ID, dimensions, last-used date, and next scheduled deployment to eliminate unnecessary handling.
How long banners last and what shortens their life
Realistic lifespan expectations depend on where and how a banner is used, not just how it is stored.
Outdoor banners face UV radiation, wind stress, rain, and temperature cycling simultaneously. Under typical outdoor conditions, a standard vinyl banner used seasonally tends to show visible degradation, including color fading and hem fraying, within one to three years. Banners stored correctly between uses can extend that window, but outdoor exposure accumulates damage that storage cannot reverse.
Indoor banners stored under the 60/60 conditions described above can remain deployable for five years or longer, provided they are rolled correctly and inspected on schedule. The primary lifespan killers in storage are humidity-driven mold, UV-induced yellowing, and thermal fatigue from temperature cycling, all of which the protocols in this guide directly address.
Material and finish type also matter. UV-cured ink films, like those used on modern digitally printed banners, tend to be more resistant to humidity-related delamination than solvent-based inks. Matte finishes are generally more forgiving of print-side-in rolling than glossy finishes. Heavier-gauge vinyl substrates resist mechanical wear better but are also more susceptible to crease damage if folded.
Pro Tip: For banners rotated through outdoor events on a frequent schedule, shorten the inspection interval to every two to three weeks during active use seasons. Catching a failing grommet or a developing hem tear early costs minutes; missing it costs a banner.
Options for old or damaged banners
When a banner reaches the end of its useful life as a display, the material still has practical value.
- Tote bags and pouches: Vinyl banner material is waterproof and durable. Local makers and community organizations regularly repurpose retired banners into tote bags, pouches, and wallets.
- Tarps and protective covers: A large banner in good structural condition but with faded graphics can serve as a waterproof ground cover, equipment cover, or temporary weather shield.
- Craft and art material: Schools, community art programs, and makerspaces often accept banner material for projects. The smooth surface takes paint and adhesives well.
- Shipping protection: Rolled or folded banner material works as padding inside shipping crates or around fragile equipment.
- Donation: Organizations like Habitat for Humanity ReStores and local theater groups sometimes accept banner material for practical reuse.
- Recycling: PVC recycling is limited in the United States. Most curbside programs do not accept vinyl banner material. Specialty vinyl recyclers exist in some metro areas, and some print shops participate in take-back programs. Check with your local print supplier or municipality for current options.
- When to replace rather than repair: If a banner shows structural tears through the print area, significant mold penetration, or graphic fading that misrepresents your brand, replacement is the right call. A damaged banner in public display carries a brand appearance cost that outweighs the material cost of a new one.
Why temperature cycling and humidity damage vinyl: the evidence behind the 60/60 rule
Understanding the physical mechanism behind the 60/60 target makes it easier to apply correctly, especially when you are choosing between imperfect storage options.
PVC vinyl banners contain plasticizers, chemical additives that keep the substrate flexible. When temperature rises, plasticizers migrate toward the surface of the material. When temperature drops, they contract back. Repeated cycling accelerates this migration, leaving the substrate progressively stiffer and more brittle over time. This is plasticizer migration, and it is the primary reason that temperature stability matters as much as absolute temperature. A banner stored at a steady 70°F will typically outlast one that cycles between 50°F and 90°F, even though neither extreme is severe.
Ink films face a related but distinct stress. The ink layer and the vinyl substrate expand and contract at slightly different rates with temperature change. Over many cycles, this differential movement creates micro-stresses at the ink-substrate interface. Eventually those stresses produce delamination, which appears as flaking, cracking, or a milky haze in the print area.
Research callout: Humidity above 70% RH creates active mold risk inside sealed rolls. The 60% RH target in the professional benchmark provides a meaningful buffer against both mold and plasticizer instability.
Humidity compounds both problems. High relative humidity softens the plasticizer-depleted surface layer, making it more susceptible to mold colonization and ink transfer. Low humidity accelerates embrittlement.
Your printable pre-storage checklist
Print this list and keep it at your storage station.
- [ ] Banner is clean, rinsed, and fully air-dried (no heat used)
- [ ] Seams, hems, and grommets inspected; repairs completed
- [ ] Grommets wrapped with foam or acid-free tissue
- [ ] Rigid core (3–4 inch diameter) positioned at one short end
- [ ] Banner rolled evenly with consistent tension, print side out for glossy finishes
- [ ] Roll secured with soft straps or cotton ties (no rubber bands)
- [ ] Roll placed inside opaque tube or padded bag; end caps secured
- [ ] Tube stored horizontally on shelf or rack, off concrete
- [ ] Storage area confirmed away from HVAC vents, direct light, and exterior walls
- [ ] Tube labeled: banner name, dimensions, last-used date, next inspection date
- [ ] Next monthly inspection date added to calendar
For high-volume storage, number each shelf position and record which tube occupies it. This prevents unnecessary handling when you need a specific banner quickly.
Why we take banner storage seriously at Hatpatchsupply
We work with banners and printed materials every day, and we see firsthand how much a proper storage routine extends the life of a quality print. The banners we supply are built to perform, and that performance depends as much on how they are handled between uses as on the materials themselves. Proper vinyl banner storage is not an afterthought for us; it is part of the product experience we stand behind.
Hatpatchsupply has the supplies to back up every step in this guide
The advice in this guide works best when you have the right materials behind it. Hatpatchsupply supplies custom UV-printed banners and branded display materials built for repeated use and proper long-term care. Our UV-printed products use ink technology designed for durability under the storage and handling conditions described here, and our team can help you choose the right format for your display needs.

Whether you need a new banner built to last or want to explore our full range of custom branding products, including UV-printed patches, leatherette designs, and display accessories, Hatpatchsupply makes it straightforward. No minimums, fast production, and products designed to hold up through real-world use and proper storage cycles. Browse our custom UV hat patches or visit the main store to see the full catalog and place an order today.
Sources
- Vinyl roll storage — Arlon
- Banner Care & Installation Instructions — FASTSIGNS
- How to Store and Transport Banners Without Creases - Mega Format
- Roll & Maintain Vinyl Banners | Dynamic Banners & Signs
Recommended
- UV Printed Hat Patches: The Complete Guide for Custom Hat Makers - Hat Patch Supply by Hat Foundry
- The Software Behind the Machines: A Laser Engraving and UV Printing Wo – Hat Patch Supply
- FoundryTags Now with pressure activated adhesive! – Hat Patch Supply
- How to Start a Hat Bar: Equipment, Patches, and What Actually Sells – Hat Patch Supply
Ready to press your own?
Custom UV patches with no minimum, shipped in 72 hours — or grab a free-shipping sample pack first.